Best wishes to my colleagues in the S Scale Workshop for a happy, healthy and train-filled 2012!
I'm looking forward to getting trains running this coming year on my CNR Port Rowan layout, and I'm really glad I decided to tackle this project in 1:64.
- Trevor

The S Scale Workshop is comprised of a small group of like-minded modellers - from Ontario, Quebec and Pennsylvania. We exhibit at a limited number of annual events, primarily in the Southern Ontario region.
Dec 31, 2011
Dec 27, 2011
Arch Bar Trucks
Thanks to fellow Workshop member Jim Martin, who placed a bulk order for the group for Arch Bar Trucks from Iron Rail Models. I picked up my share of the order last week and they're very nice - well worth the $8.25 per set.
As can be seen here, these trucks consist of white metal bolsters and equalized side frames, with insulated-one-side brass wheel sets on metal axles. I will likely upgrade the wheel sets with suitable substitutes from Northwest Short Line.
- Trevor
As can be seen here, these trucks consist of white metal bolsters and equalized side frames, with insulated-one-side brass wheel sets on metal axles. I will likely upgrade the wheel sets with suitable substitutes from Northwest Short Line.
- Trevor
Dec 22, 2011
S Scale Dairy Cattle?
Anybody know if dairy cattle figures are offered for S scale? I need 5 or 7 for a future scene on my layout.
Thanks in advance!
- Trevor
Thanks in advance!
- Trevor
Dec 19, 2011
Layout progress and an Android Tablette
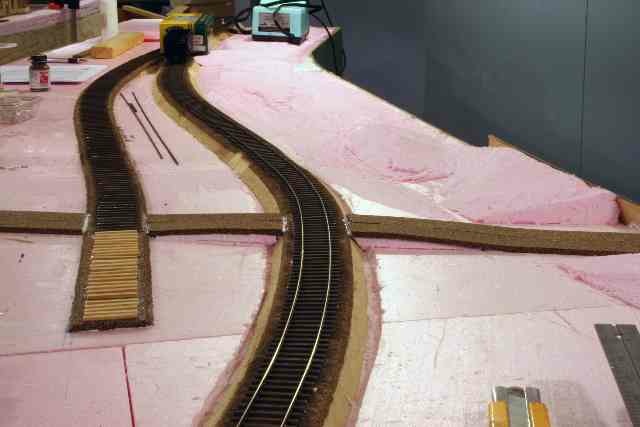
No additional trackwork over the weekend but have wired and motorized all the remaining tracks and turnouts. I also prepared the surface of the engine terminal area, laying and painting the natural fiber that I use for roadbed.
However, the most fun part of my weekend was to run the trains with my Asus Transformer Android tablet through my home WiFi.
To do this, I had to run a CAT6 cable between my office and the layout room to connect my laptop to the Loconet of the Digitrax system and install the latest JMRI http://jmri.sourceforge.net/. JMRI is basically a Java interface that runs on your computer and allow to send commands over the Loconet. I was already using it for programming the locomotive decoders.
It has many additional functions where you can control your trains, and turnouts, name your turnouts and create routes, block, etc… I plan to use the turnout and route functions to control the switches. However, the drawback is you need the use the computer and mouse to control them, not good when the computer is in different room. But thanks to the tablets and smartphone, there is an App for that! It is call a Withrottle for Apple and Engine Driver for Android
I downloaded the WiThrottles and Engione driver for both my iPhone and Android tablet. The Android one is free where the iPhone one have a light version for free and full version for 9.99$. I prefer the Android version because I can see all my routes and turnouts (defined in JMRI) in a table and with a finger touch, align the switches for specific routes. Where on the iPhone, only a wireless throttle and no direct access to the turnout or route control.
Using my WiFi, the Android tablet connects to my computer and I gain the full control of the layout (and the trains in one hand). Even the locomotive control is fun although for security reason, I may still use a dedicated Digitrax throttle. (imagine the communication is lost and have a train going into a stub end and fly over to the floor.) I don’t really care about the life of the crews but how about those expensive brass engines…
After spending a good part of my Sunday afternoon programming and configuring the system, I have run the trains all evening, finding some programming mistakes and mostly testing the concept. The concept works for me as a single operator. To work for multiple operator, each operator will need a tablet or I should install holders for 3, maybe 4 tablets at strategic location around the layout. These would act as control panel that users could carry to get closer to the action.
The apps still need to be refined, It has been design for Smartphone, not for tablet so I can’t use it in landscape mode and currently has no build-in function to see the layout schematic. However, this may not be needed anyway because JMRI also has a mini Web server function that I just started to play around with last night. The mini Web server turns your computer into a mini web server for all the JMRI windows and using the browser in your smartphone or tablet, you have access to the JMRI window, including the layout schematic.
To test it, I simply draw a turnout in the schematic panel and assigned a valid turnout number on my layout. With a click of mouse over the switch in the schematic panel, I could change it on the layout. I then activated the mini-web server of JMRI to access the layout schematics with my iPhone and Android tablet. I could connect to the “web site” with my Android tablet but could not get it to work with the iPhone (it will, just not as simple to configure I guess). Well, it works! I could change the switch position with a finger touch over the turnout schematic on the tablet.
My next step will be to draw my layout schematic in JMRI to further test the concept. Did I mentioned that the schematic is interactive? it actually shows the switch position based on the last command and the system allows actual feedback if wired accordingly.
Simon
Dec 18, 2011
Getting spiked
I've been working on my home layout, and I'm pleased to report the first rail is spiked.
I'm not as fast as fellow Workshop member Simon Parent, but I'll get there. I don't have that much track to build.
I'm using stainless steel spikes from Proto 87 Stores. I've added a posting about these spikes to my layout blog.
- Trevor
Dec 17, 2011
Cabooses

I have almost finished my Ridgehill CNR wood sheathed caboose kits, all wide window spacing. To finish up, I need to make and install the splash guards on the end railings and add the grab irons to the eaves. The narrow window spaced one was scratch built out of styrene. Two have Kadee couplers and two have Sergent. All have NWSL wheelsets of either code 110 or P64.
cheers,
Andym
The New Corner
 Caine's Corners
I have started a new corner using the benchwork of the only remaining part of the Marrocco/Merton S Scale Model Railway Club which was at my school. My student, Christopher Caines, built this with me so I am calling it Caine's Corners.
 Because the module had been damaged by other students not connected to the club, I had to replace the original track and roadbed. It is in two sections and this time I remembered to place a piece of sheet plastic in the joint in order to keep the sections from gluing together. The Great Green Fuzzy Corner had to be forcibly separated twice. Hopefully this works. Here are the bridge rails.
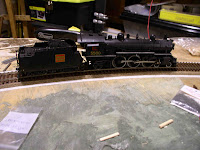
I tested the corner with CNR Pacific 5580 and a very touchy Express reefer. No derailments so far...Phew! Now on to painting the ties and adding the scenery which will probably be a simple field.
 cheers,
Andym
Dec 16, 2011
New photo of my layout progress
I have been busy the past couple of weekends and evenings adding more switches and finishing the coach yard and the 3-tracks of the passenger station. I still need to complete the wiring and adding the switch motors and control since that is not visible, I took a few photos anyway. Simon's layout pics
I could not resist to take out many cars and locomotives out and on some evenings, I have not been productive as I was running the trains instead.
Simon
Simon
Dec 15, 2011
Copetown 2012
Workshop member Pete Moffett is busy organizing the group's appearance at the annual Copetown Train Show. (Thanks, Pete!)
Wow - February is coming up fast! I won't have a module ready to participate by then (and in any case, the configuration needs to be determined now) but I hope to grab a throttle for at least part of the day on Sunday to give the regular Workshop members a bit of a break from entertaining the crowds.
If you haven't yet seen the Workshop modular effort in person, Copetown is always an excellent venue. It's a modest-sized show - certainly nothing like the Toronto Christmas Train Show and nowhere near a TrainFest or a Springfield. But Copetown attracts the best modellers from across Ontario (and beyond) and has become a highly-respected gathering of serious model railway enthusiasts.
- Trevor
Dec 13, 2011
If I didn't have all this HO...
I heard that phrase again yesterday, from a talented HO modeller as he admired one of my CN 10-wheelers, built by fellow Workshop member Simon Parent.
The guys in the Workshop hear this a lot. Personally, I find this very amusing. Maybe with time it'll get tiresome, but I'm still new to S.
My answer has always been, "it's a hobby". If one is looking for an investment, it's not model trains. So if you see something different you want to try - a new scale, gauge or prototype - go ahead and try it. Yes, it's going to cost you some money, but all hobbies cost money so just go with it and enjoy.
- Trevor
Dec 6, 2011
First layout visit
Today was an interview recording day for The Model Railway Show podcast and - as we have done for the past few months - Jim Martin and I used the opportunity to welcome some of the Toronto contingent of the S Scale Workshop to join us for lunch at Harbord House.
Andy Malette was able to take part.
Jim, Andy - great to see you both and enjoy a couple of pints of Conductor's Craft Ale from Junction Craft Brewery!
After lunch and before Jim's afternoon interviews, I provided what I think of as the first proper tour of my new S scale layout. I'm almost done staining and distressing ties, and the layout lights are now installed, so it's starting to look like a model railway - finally.
I'm looking forward to future open houses.
- Trevor
Dec 4, 2011
Why I'm here at all...
I've been working on a biography this weekend for my page on this group's blog and I realized I wouldn't even be working in S scale if it weren't for the guys in the S Scale Workshop.
It's great to have a local group of like-minded modellers who are so willing to share their ideas and encouragement, and who bring a real can-do attitude to the hobby. (Yes, can-do: There's surprisingly little griping in the group, despite the fact that S is a niche scale that has faced its share of challenges. For example, instead of moaning about the lack of a product, members in the S Scale Workshop figure out how to make it so the rest of us can benefit from it too.)
Simon builds exquisite locomotives and is willing to share his time to make sure the rest of us have 10-wheelers and moguls.
Andy creates wonderful passenger cars (and a 4-6-2!) - and I'm really looking forward to his eight-hatch refrigerator car models - coming soon!
Oliver and David have commissioned resin kits for essentials like CNR cabooses and Fowler boxcars. Once again, essential pieces for the group.
Jim and Pete generate articles that help generate funds so that the Workshop can continue to travel to exhibitions - and often attend when the rest of us can't, to keep the S flag waving.
Chris has done a fantastic job of trouble-shooting the potential nightmare that is a modular layout powered by DCC and helping to bring others up to speed on all things electronic.
John - like me - is relatively new to the group. (John: It's nice to not be alone as the newbie and I know you and I are going to have to work hard to play catch-up with these guys!)
Everybody offers their help and their insights into the history, products and personalities of modelling in 1:64. I drew on the experiences of all of them as I made my decision to switch to S - and now as I work on my home layout - and I haven't regretted it one bit.
Thanks guys!
Trevor
Dec 3, 2011
where it all started
 |
| an overall view of the module set |
I was very short of space in my condo at this time, and Trevor graciously offered a spot in his basement to carry on with the build. Thankfully I only cracked my head on the ductwork a couple of times before I learned to hunch over at the proper moment.
A Weller temperature controlled soldering station (the blue box, upper right) is an invaluable tool for the hand laid track enthusiast. Its fine tip and precise temperature management works for brass sheet, rails, and electronics - even for delicate DCC wiring harnesses and larger surface-mount components.
 |
| an even earlier snapshot of just the #8 turnout |
Floquil's "tie brown" and "rail brown" paints were used extensively at this stage. The contours are formed using Styrofoam SM insulation board, sculpted extensively by Trevor using knives and a Stanley Surform tool.
The subroadbed is "Tentest" pressed paper board similar to, but lighter in density than, Homasote. I would not use this method again as the Tentest proved dimensionally unstable. Roadbed is Midwest cork; half a piece of HO scale and 1/2 a piece of O scale. Ties are sugar-pine from Mt. Albert Scale Lumber, and the rail is Micro Engineering code 83. Spikes are ME small & micro sizes as required.
 |
| appropriately scruffy ties at the end of the siding |
The tail end of the siding was left without rails, hinting that these had been lifted at some earlier point in time. A very close look will reveal the bolt holes drilled through the web of the rails. Trevor added this tiny detail for me.
Cars and trucks were to cross both the siding and mainline on a single lane dirt road. This road was built up quickly and easily using SM board and cork strips.
Adhesives used during construction were Weldbond PVA glue and No More Nails for Projects (Styrofoam safe).
Chris
Subscribe to:
Posts (Atom)